PART 1: CREATING A SITE AND ADDING PICTURES
PART 2: (Below) ADDING A PAGE TO LINK TO

Step 2: Click 'new' as above
Step 3: You will be prompted to name your site

.png)
Step 5: Click on INSERT on the ribbon and choose Picture - choose the picture you would like to use (e.g. photo of student, topic, avatars)

Step 6: Select the picture you want to add a link to by clicking on it

Step 7: Click on LINK on top left of ribbon - add the link you want to go to

Step 8: Click 'save' on top right to exit editing view

HANDY HINT: Click on 'Open in new tab' so it doesn't navigate away from the site
PART 2: ADDING A PAGE TO LINK TO
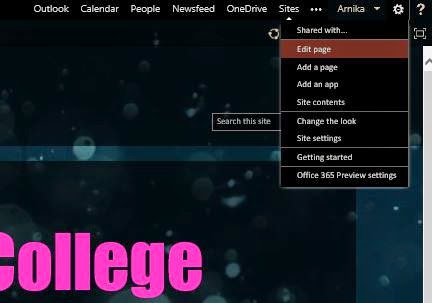
Step 1: Click on the settings cog on the top right of the page
Step 2: Select Add a page

Step 3: You will be prompted to name it

Step 4: You can also copy and paste the link from there.
Step 5: Paste the link into the Insert Link when you click on the image

HANDY HINT: If you lose the page
- Click on the settings Cog
- Click on Site Contents
- Click on Site Pages
You will see a list of pages as above
No comments:
Post a Comment